Blueshire Services
ImageMap App
User Documentation
Version 1.0.0
Table of Contents
7. Creating A New ImageMap Screen by Creating a Batch File
Appendix A - Default Parameters
Appendix B - Input File Format
Appendix C - Technical Information
ImageMap is a visual app designed to sit on your mobile. It is designed to integrate images with text and icons. This intergration of image and text/icons can be seen through the examples. The first example displays a work place in an office map format together with the details of the peaple that work there. The idea came about after entering another office and trying to locate an individual. I thought there must be an easier way and developed this app in response to that.
The concept is that the organisation will develop the office map and csv file containing the employees information and allow each individual to load it onto their Android mobile. There is an example office map and employees csv file that can be loaded to illustrate the app.
The second example of the intergration of images and text is the car example. This displays an iconic image of a car together with text items and drill objects that allow the user to see detailed photos of the specific parts of the car.
Within the app there are four screens. These are as follows:-
- Introductory Screen Giving List of Displayed Screens
- Main Screen For Specific Screen
- Database Screen Allowing the Import and Export of Batch Data
- Log Screen
To set up ImageMap only one file is required. This is the following:-
To run the examples the data csv file is required plus the associated images. These are the following:-
The Data csv file, inpDesk2.csv.
The Office Map jpg file, officedesk2.csv.
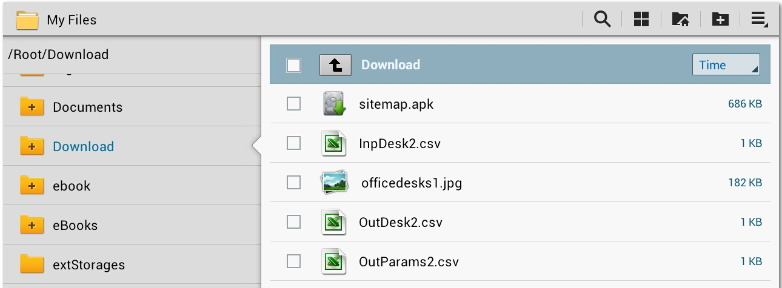
The name of the jpg file is defined within the Data csv file. The details of creating your own data csv file are detailed in the chapter "Creating A New ImageMap Screen".
These three files are saved in the directory /download as shown in the screen display. Tap on the apk file, ImageMap.apk and Android will load the app. Next you will need to load the data from the csv file.
From the "Introductory Screen" shown in the following section, pull up the main menu and select the "Database" option. When the database screen is displayed select the first button, "Import Data". This will import the data from the csv file also defining the png display associated with a specific set of data. Go to the Home screen and from there the Office Map screens can be selected.
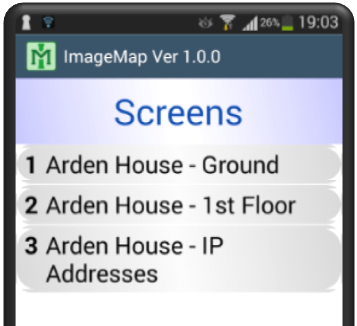
On entering the app the screen as shown on the left is displayed. It shows each of the screen maps that are currently loaded.

Not all screens are displayed. When you create a screen which is detailed in Section 5, you have the option of selecting the check box entitled "Display". If this is set then the screen created will be displayed on this the introductory screen.Other screens might be created that are accessed from other screens. Examples of these can be found in the examples.
On selecting one of the Screens your display will change to the specific screen selected. Other options are to select the menu as shown on the right and the two options, Database or Log are available. These options are detailed in the section "Database and Log Screen".
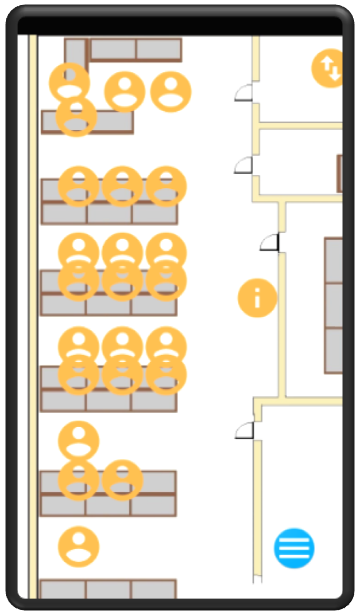
From the Main Introductory Screen List screen you access specific screens by selecting one of the list items. The Display as defined for that ImageMap entry is then displayed. Each Screen is composed of two parts the underlying image as given in the png or jpg file and the objects sitting on top of the image.
There are three types of object currently displayed on the Screen. These are as follows:-
![]()
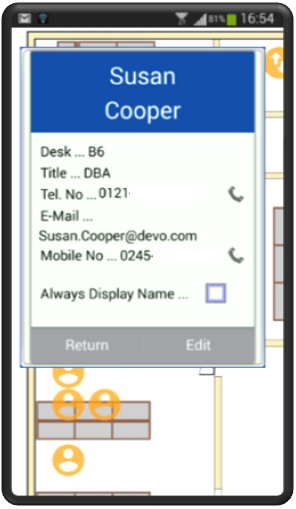
Employer Item. This object will store information on the employee such as phone no., mobile no., e-mail address, name and title. An example of an employee's data is shown on the right.
![]()
Information item. This object stores information on specific items such as printers. In the example it gives the printer details so that if you are new to the office the details to access the printer from your PC can be found here. The information stored include the item code, its title and notes on the item.
![]()
Link Item. This object links through to another screen allowing the user to access another screen without the need to go back to the Introductory Screen. It allows the creation of hierarchies thereby creating a structure.
In addition to the three types of objects there is the menu icon shown on the left screen shot in the bottom right and displayed in blue. Pressing this will bring up the screen menu that will be detailed later in this section.
Each object can be in one of three modes. There is the standard mode where the icon is coloured yellow as shown above. Then there is the selected mode where the object icon is colored in blue. Only one object can be selected at any one time. therefore only one object on the screen can be colored blue. This excludes the menu icon. To select an object the user just touches the screen where the icon sits. Once an object has been selected touching the icon a second time will result in a dialogue being displayed that will show all the details of that object. An example of this is the employee dialogue shown above on the right.
The third mode is the drag mode and can be identified by the icon appearing in grey. To put the object into drag mode touch the screen on the objects icon and keep touching for eight or more seconds. This will result in the icon's color being set to grey. Once the icon is in drag mode you can move the icon to a new position on the screen. Just touch the icon with your finger and keeping your finger on the icon to move it to the new position.
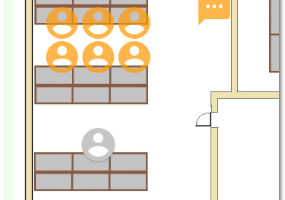
The user can move the display screen up or down by simply moving ones finger over the screen in the direction that you want the display to move. The user can also shrink or expand the screen by putting two fingers on the screen and either moving them together to shrink the screen or move the two fingers apart to expand the screen. This is the same functionality as you are familiar with if you have used Google Maps and many other apps that display images.
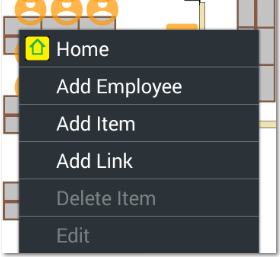
Further options are available by pressing the menu key which results in the menu as shown on the left appearing.
The Home option returns the user to the Introduction Screen. Entering one of the Add Items will result in a dialogue box appearing allowing the user to enter the item details. The icon for the item will appear on the screen at the location where you pressed. The Delete and Edit options are only active if an icon has been selected and is set to blue, indicating that it is selected.
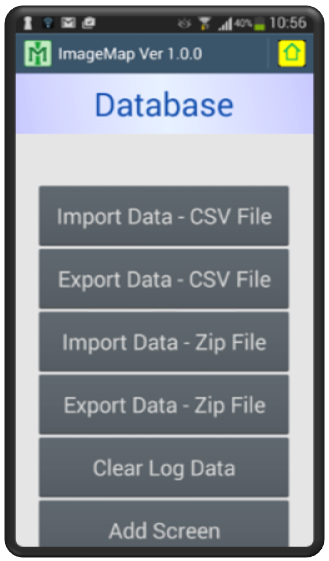
The database screen has eleven options. These are as follows:-
- Import Data - CSV File
- Export Data - CSV File
- Import Data - Zip File
- Export Data - Zip File
- Clear Log Data
- Add Screen
- Edit Screen
- Drop Screen
- Export Parameters
- Import Parameters
- Set Default Parameters
Button 1 - Import Data - CSV File. This option will load data from a csv file. On the button being pressed a dialogue will appear displaying all the csv files in the currentl import directory. You have the option of selecting one, then pressing the Import button and the data will be loaded. It will not delete any data. In most situations you will wish to remove the current screen data before importing the data.
Button 2 - Export Data - CSV File. This option outputs the data already in the database into a flat file. On entering the option a dialogue listing the current screens will appear. The user can tick the screens that are to be output to the csv file. The default file name will be displayed but the user has the option of editing the file name to a file name of their own choice. This will be output in the same format as the import file. Both the format for the input data and the output data is given in Appendix C.
Button 3 - Import Data - Zip File. This option will load data that had previously been output as a zip file. This is to enable the transfer of data between users of ImageMap. One user can export a screen as a zip file, e-mail it to another user who can import the data. It zips the csv file of objects together with the image file into one zip file that can easily to transferred.
Button 4 - Export Data - Zip File. This option will export the data in a zip file. It will output the data to a csv file and then load the csv file together with the image file into a zip file.
Button 5 - Clear Log Data. This option deletes the log entries. Over time these can build up and if they are old and no longer of value you may wish to remove them.
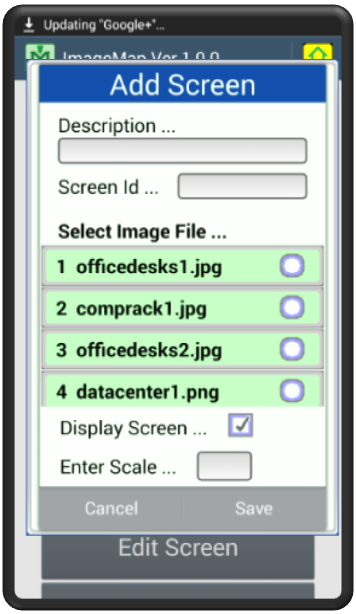
Button 6 - Add Screen. This option inserts a screen entry into the database. To add a screen you need to associate an image file with a screen description and this is done via the screen entry shown above. The user is also requested to enter a description, an id and whether to display the screen. Setting the screen to be displayed will result in the option to display the screen on the main menu. If the display flag is set then the entry will appear under the description line. The id will also appear and the id has to be entered and has to be unique. A screen also has to be selected. Failure to do so will result in an error message.
Button 7 - Edit Screen. This option allows the user to edit the details of a specific screen. When a specific screen is selected the details will be populated in the text fields. The user can modify the "Display Screen" and "Enter Scale" text entries. Having modified an entry the user has to enter the save button. If the save button is not pressed but another screen is selected then the changes are not saved.
Button 8 - Drop Screen. This option removes a screen entry from the database. It also removes the items associated with that screen. This is the button you may want to enter prior to importing a fresh set of data. It does not remove image files from the Android device.
Button 9 - Export Parameters. This option outputs the parameters to a csv file in the default directory. The default name for the file is OutParams2.csv.
Button 10 - Import Parameters. This option imports the parameters and replaces the existing values with the new updated values. It is through this method that you can modify the default parameter values given in Appendix A.
Button 11 - Set Default Parameters. This option will replace the existing parameters with the default parameters as shown in Appendix A.
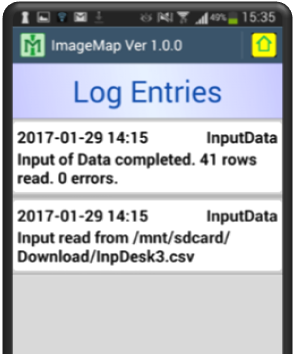
The log screen shown on the left displays log data which are in general changes to the database, either importing or deleting rows. Updates are not usually reported as they can occur on a regular basis. It is a good idea after importing fresh data to check the log screen to confirm that the data has been succesfully imported. Errors in importing the data will be displayed here.
Both the Database and Log screen contain the home icon displayed across the top bar. This will take the user back to the Introductory screen. Other entries found in the menu will take the user from the Database screen to the Log screen and vice versa.
7. Creating A New ImageMap Screen by Creating a Batch File
Creating your own Office ImageMap is relatively easy. The first step is to create an image file of the office showing the desks, doors etc. This can be created on Microsoft Paint. Give the drawing any name. This can be a png file or a jpeg file, ImageMap will accept either. Copy this onto your Android device into the input/output directory which by default will be /mnt/sdcard/Download.
Now go into ImageMap, select "Database" from the menu and then enter the "Add Screen" option. Give the screen a description, this description will be displayed in the list on the main screen. Enter an id, this has to be unique and select the screen image from the scrollable list. Tick the "Display Screen", this will cause the screen to be displayed in the main screen and enter a scale. The default is 10 which results in no change to the scale. This value can always be adjusted at a later date. Now press the "Save" button.
Now you enter the detail items. Go to the entry screen and select the new screen entry. This will result in your new image being displayed. Press the menu icon in the bottom right hand side and select from one of the following :-
- Add Contact
- Add Item
- Add Link
Fill in the details and press save. The screen will have a new icon displayed at the top left hand side. To move the icon to the desired position, press down on the icon for eight seconds. The colour of the icon will change to grey. You can now move the icon to the required position by touching the icon with your finger and then moving your finger to the icons new position without taking it away from the screen.
Once the new screen has been completed you can create a zip file of it by going to the "Database" menu and pressing the fourth button, "Export Data - Zip File". This will create a zip file of the screen image and the entries which can be loaded by other users of ImageMap.
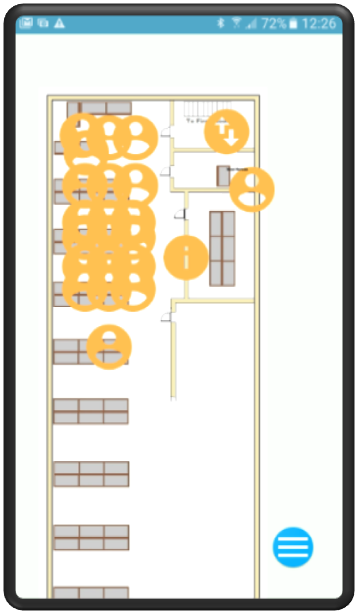
It is one of Androids advantages that there are many types of equipment that run on the Android OS. Within the mobile phone equipment set there is a wide variety of brands and a variety of models within each brand. Each has its own hardware and this includes a variety of screen density.
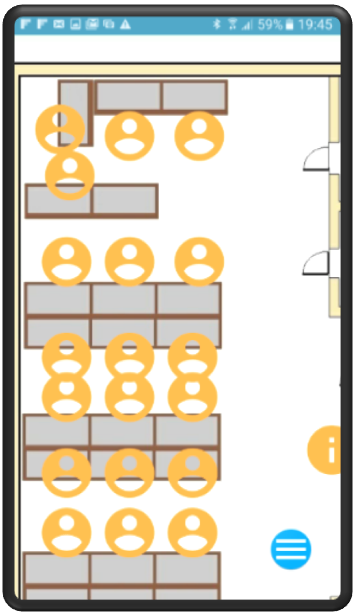
Comparing two models from the same manufacturer, the Samsung S3 and the Samsung S6. The S3 has a screen of 720 * 1280 pixels while the S6 has a screen of 1440 * 2560 pixels. That is the S3 has 306 ppi while the S6 has 577 ppi. The result of this is that an image drawn with the S3 in mind will appear considerable smaller on the S6. This can be seen in the screen dump of the Samsung S6 on the right.
If the user was to expand the image by placing two fingers on the screen and then moving them apart this would increase the size of the image but it would also increase the size of the icons. What we need is to increase the base size of the image. The solution to this is the screen parameter "Enter Scale". The default for this value is 10. Setting the value at 10 results in no change to the screen size. Increasing the value to 24 increases the screen size by 2.4. The screen shot on the left illustrates this for here we have set the scale at 24 with the result that the image relative to the icons is more in proportion. The user can now decrease the size the of the image by placing two fingers on the screen and bringing them together thereby decreasing the screen size but also the icons.
Appendix A - Default Parameters
| Id | Value | Description |
| 1 | “mnt/sdcard/Download” | Input Output Directory. |
| 2 | Not used | |
| 3 | “InpParamFile.csv” | Input Parameter File. |
| 4 | “OutDesk2.csv” | Output File |
| 5 | “OutParams2.csv” | Output Parameter File. |
| 6 | “OutLog2.csv” | Output Log File. |
| 7 | “mnt/sdcard/Download” | Input Image Directory |